A Method for Making Sharp, Distinct Mounded Raised Beds with Hand Tools Only
A problem that hand tool farmers have faced for years is how to actually deal with Mother Earth, since we have decided not to crush and beat and chop and cut her into submission with roaring machines such as rototillers, or worse ploughs, disks and harrows attached to monstrous tractors. It is an existential, philosophical crisis that one faces when confronted with the brutal equation of Energy Returned on Energy Invested (EROEI) and the frightening fact that on average it takes 10 calories of oil to make one calorie of food.
Stricken with the reality of one’s existence depending on oil wells, you find yourself looking at stubborn clumps of grass clinging desperately to soil for very life, for it’s own place in the sun. And here you are, with a shovel and a wheelbarrow, determined to separate the patches of grass and their root-clumps from the life giving soil, so you can colonize a piece of God’s Green Earth for the use of Man.
It takes determination and patience and persistence above all to be a principled hand tool farmer. The one allowable exception to the hand tool rule is that you can use a pickup truck to bring manure to your farm. But no machines should ever tread on your growing spaces, not even your feet if possible. Why? The first reason is that machines crush the soil structure and destroy the microbial soil web. Soils under mechanized cultivation become homogenized, and seem to dry out quicker and wear out more quickly, requiring more frequent amendments. The second reason is that machines require up-front investment and continuous fueling and maintenance, driving overproduction and “biting off more than you can chew.” Thus you have to sell X amount of your harvest just to break even, and the existence of the Industrial business farmer depends on, of all things, the price of fuel! The sorry history of business farming has millions of sad tales of debt, ruin and even suicide of mechanized business farmers who couldn’t pay their banker. The ethic of hand tool farming is to reverse these economics – to minimize expense, to completely self capitalize, to tap into the waste stream for soil and fertilizer (e.g. horse manure and spoiled hay of local horse farms), to feed oneself and one’s family before thinking of selling any of the harvest, and to enjoy what you are doing without the pressure of having to sell X amount of the harvest just to break even. Ultimately the goal of the hand tool farming movement is to set the example and popularize our model of food production creating a social and political movement based on family-scale backyard agriculture, and to exert influence over national agricultural policy to favor family farms practicing biological farming over corporate farms using Industrial and Petrochemical and GMO. The motto of the hand tool farming movement is “Save yourself; then save others.” We Americans are passively responsible for a lot of the problems in the world; hand tool farming is a necessary first step towards taking responsibility and control of ourselves, so we can eventually take responsibility for what’s being done in our names.
But first we must conquer our own fear of that hard, stubborn sod. How do we, flabby modern people, colonize a piece of God’s Green Earth for our use? There are two basic problems in turning lawns or meadow into garden: First is distinguishing the growing space from the walking space; second is taking the growing space from Nature for use by Man by removing grass, weeds, and clumps of roots and making nice fluffy soil for planting and cultivating. I have tried many ways; but only last weekend I found the best way.
Equipment needed: A pointed shovel, a wheelbarrow, and a dryer drum or other metal cylinder of similar size. A dryer drum should be easy enough to acquire; call local appliance stores and offer them 10 dollars if they can pull one out of a “dead dryer” for you, or go to the dump or look out back of appliance stores and get one yourself. You’ll need a screwdriver and maybe a 5/16 nut driver, and a knife to cut the belt that is around the dryer drum. A garbage can with the bottom cut out will work too.
Sifting the clumps of sod to separate weeds and rootballs from good dirt is the main activity. You shovel up a piece of sod where you are going to clear land, hold the blade of the shovel full of sod over the wheelbarrow and shake it up and down. Another thing you can do is put the clump of sod in the wheel barrow and gently shake it to shake out the soil so you are left with the root ball and grass clump, which you can throw away.
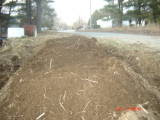
Clear the land big enough for the dryer drum or other bottomless barrel, and put the drum on the cleared land, and dump the dirt in your wheelbarrow into the dryer drum. Picture 1.
[IMG]http://i294.photobucket.com/albums/mm96/rfreez/Hand_tool_gardening/1.jpg[/IMG]
Then clear land and sift more soil in the area around the dryer drum to give it some space on both sides, and to start advancing clearing land down the row. In my case I have multiple dryer drums so I filled a second one with sifted soil next to the first onePicture 2.
[IMG]http://i294.photobucket.com/albums/mm96/rfreez/Hand_tool_gardening/2.jpg[/IMG]
Then you take the dryer drum and pull it off, leaving a mound of dirt. Do this repeatedly down a row, so you have a straight line of mounds of sifted dirt with cleared land around it, so you have a rectangle about 2.5 feet wide and as long as you please. Then take a rake and rake the mounds together, and flatten the whole thing out just a little bit. Now you have a beautiful mounded raised bed! Picture 3
[IMG]http://i294.photobucket.com/albums/mm96/rfreez/Hand_tool_gardening/3.jpg[/IMG]
Put down grass clippings or hay and wooden boards or flat stones on the borders around the raised bed so have your distinct walking path and distinct borders. DO NOT WALK ON YOUR RAISED BED EVER. It will be slightly elevated, and it will have a sharp, professional look, as though a rototiller machine did it. If it ever needs to be “freshened up” or you want to add amendments like manure or grass clippings, you can either throw them right on, or dig out a space the size of the dryer drum, put the dryer drum back on, and fill the dryer drum back up with whatever soil mix you want to use. It will be much quicker than the first time because you won’t be sifting out vegetation and root clumps.
The trick is, of course, the dryer drum. The dryer drum acts as a “mold.” Soil is interesting stuff; it’s certainly a solid, but in some ways it can act like a liquid or at least a gel. If you just try to mound it with a shovel, it won’t pile up very high, or very neatly. But if you pile it up inside a dryer drum, when you pull the drum off it does keep a lot of its height and a lot of its shape – a lot more than without using a mold.
The dryer drum molded raised bed will be easy to work with. It’s borders will be clear, and you will be able to reach into it without having to step on the growing space. The soil will be loose so weeds will pull out easy, and root crops will be able to sink down. The only disadvantage to this design is that it is time consuming and requires persistence. But the bulk of the work is the first time in building it, and you’ll have years of great yields with minimal maintenance and minimal expense. If anyone reading this feels discouraged at the thought of colonizing a piece of God’s Green earth with mere hand tools, or if you need a dryer drum, post a comment.
Wednesday, March 26, 2008
Subscribe to:
Post Comments (Atom)
1 comment:
Dear locallygrownCT, this is what my father is doing to start our vegetable garden again after many yeras of abandonment. The only thing we do not have is a dryer drum, but he is using a spade and wheelbarrow. He is doing that because he has a back problem, so he prefers a lower pace and a persistent job.
The beds we have are 12 at the moment and I'm very proud of my dad!
Thank you for sharing!
Regards,
Elena Italy
Post a Comment